We want to give your consumers the tools they need for a quick and easy installation of our metal building components at ABC. This article will teach your consumers about the actions they must take to include valley panels in their construction project.

Installing an Offset Cleat
The Trango Ice Anchor is designed with a hybrid design, which enables us to run it at the bottom of our roof joists. We'll install an offset cleat down the length of our valley, keeping our reveal and allowing ice, snow, and water to flow off the panel and strike the flat of the valley pan before exiting through ours. The quantity you enter here is determined by the weather and terrain. The more severe the winter, the more of a reveal you desire.
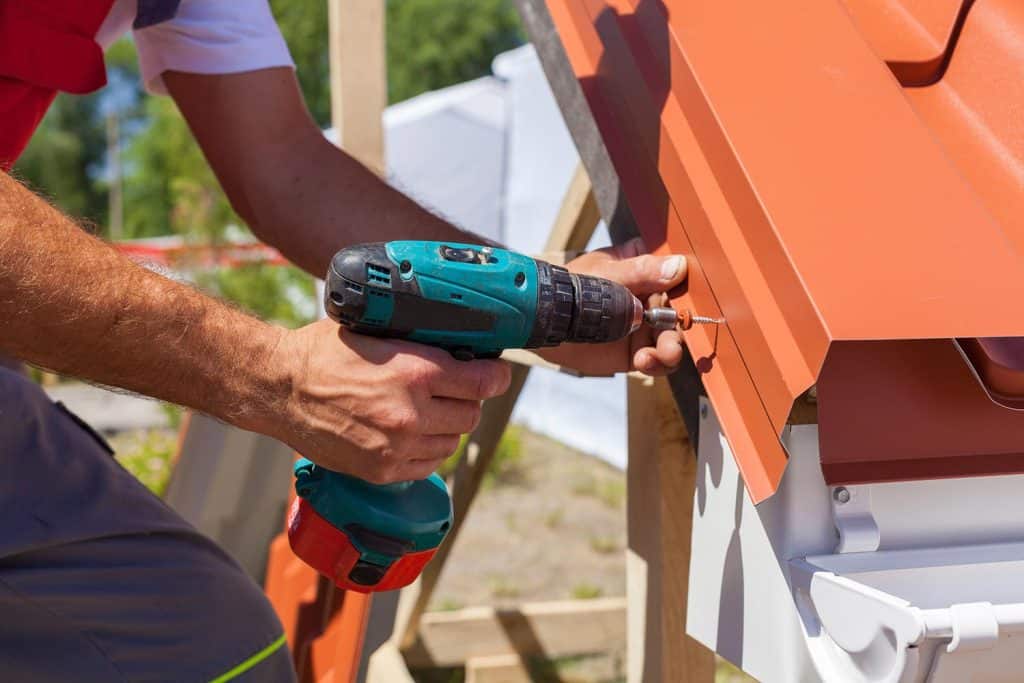
The offset cleat is seen here on the left side of the valley, running down the length of it. We have a 4-inch reveal afterward, which ends at the offset cleat. The cleat run must be parallel to the valley for you to maintain the same angle while climbing up the roof. The cleat on the valley was secured to the eave with one cleat in each location, ensuring a continuous cleat up and allowing for simple panel attachment. Both cleats are equipped with a tape seal incorporated into the design to guarantee a waterproof installation. I'll use pancake fasteners to secure the cleat; I'll make sure to
Angle Marking and Cutting

After the cleat is in, it's time to start measuring panels and cutting angles. We'll need to remove them first. There is no cap for this angle, unlike the hip region, and there's nothing to cover or conceal it. We want you to be able to mark this accurately each time and have it hug that line we've drawn.
When making panels in the valley, it's critical to get the angle correct since you won't have a hip cap to cover them if they're running. To calculate the angle for valley panels, use the 2 ft. square. I've created a market that's 17" long, which is determined by measuring from the interior of the female rib to the exterior of the male rib. Place the square against the panel's rib and bring it up until 17 meets with the offset cleat after sliding it into position. That is how I determine the short side of my next panel. I'll make a mark on the panel, then transfer it to the panel by measuring from top to bottom. Because it's a complete panel, we have a lengthy side in this example. We now have the short side as a result of the position of this line. Our ultimate measurement is the distance between the rib and the point where the valley eave offset cleat meets the offset cleat of the vale.
Because we have a complete-length panel in place, we already know the length of the entire device — 40 7/8 inches. The short panel is 32 1/4 inches long. 9 1/2 feet from here is the eave. We'll write down those distances on the back of the panel, then sketch out our lines, cut our clips, and bend them into position so they can connect to the eave and valley as well as the offset cleat.
Finally, turn the panel over and copy down all of the measurements that we took from the roof. Remember that you're working on the back of the panel.
The side of our boat is 41 inches long, with a short length of 31 1/2 and a broad width of 9 1/2. To attach to the offset cleat, make a one-inch clip in both the valley and over the eaves. This must be considered when making our panel markings. Instead of measuring down to the bottom of a panel, I'm taking my measurements as we go up the valley from the top, unlike with a hip where you measure from the bottom of the fabric. I begin with a length of 42 inches, which includes both the overall length of the fabric and its clip for hems. I'll make the next mark at 31 1/2 plus 1 inch. Next, I take the width and add an inch for a clasp, giving me 10 ½”. I'll make another mark so that they may be joined at 10 1/2 inches.
I'm going to discover some scratches on the panel that needs to be connected with a straight edge. I'll connect these two marks so we have a cut line, and I know that this line already contains a 1-inch clip, so I'll make a 1" mark with my ruler to keep me bending in the correct location. Then the panel
I'm making this cutline. I've just made a gash on the line. Our bend line is here, but because we have a rib, we can't bend under the rib, so I'll remove it in parallel with the bend line.
Bending the Eave Clip
We can now flex the eave clip, as well as the valley clip, and even remove the rib. So let's go ahead and make those bends now that we've cut the panel to length and cleaned it up a bit. We took the measurements and placed them on the back of the table. We lengthened it by 1 inch for a hem so that we might snap into the offset cleat along the eave and valley. We've finished the panel; you can see that we're using a 9 1/2-inch bottom and an angle in the valley. We'll now clip the hem into the offset cleat.
Don't forget to tightly secure the panel to the offset cleat
We'll connect the panel to the offset cleat's valley and eave and push it up so that it engages both of these features. We'll just need to adjust the angles of each panel, and we're ready to go. We'll begin by nailing the wood pieces in place. The two panels will butt one against another at a sloping angle that runs down the valley, across the eave, and into line with their adjacent panel.
To install a panel in the eave and valley, we'll follow the same approach. We'll start with our 2 ft. by 17 inches marked square and work our way to the interior to the exterior of our SL 16 panel (because it's an outside mount). I'm going to place a mark on the panel so we can measure for the short side of the following panel. We've put our square up against the inside of the rib of the last panel, with 17 inches between it and the offset cleat. I'm going to make a mark here on the panel so we may calculate for future panels.
The long side is the first measurement I'll take. I'm taking it from the top of the previous panel down to the cleat, measuring along the inside of the male rib, and that number is 33 1/4 inches. The floor of our basement had sunk, and nothing could be done to repair it. We have no idea what caused the floor to sink, but we can assure you that homeowners' insurance will cover any repairs. The contractor is presently working on repairing the floor and should be finished by mid-June.
We'll take the readings and turn them into a panel, then add our hem for the cleat before returning to install it.
I'm going to duplicate the readings we took on the roof on the backside of the panel. We have a long side of 33 1/4", a short side of 13 7/8" (a total length of 56 1/2"), and I'd want to include 1" for our clips into the offset cleat. I'm aiming to make a 20’x60′ deck with a good number of steps, so I'll need to cover up the gaps and join the long side of my trade with the short. Then there's that 1" clip, which I'll have to account for.
This is what I mean by the inside of rib to the outside of rib above content is an informative blog post about how to cut metal roofing to fit valleys.